Greater Than and Less Than Signs

Greater Than and Less Than Signs
videolesson.JPG

comparing numbers with greater than or less than sign examples

  • 3 is greater than 1.
  • The symbol for ‘greater than’ is ‘>‘.
  • We write ‘3 > 1’, which means ‘3 is greater than 1’.
  • 6 is less than 8.
  • The symbol for ‘less than’ is ‘<‘.
  • We write ‘6 < 8', which means '6 is less than 8'.
  • We can remember that each comparison symbol points to the smaller number.
  • The open end is open to the larger number and we can remember that the crocodile wants to eat the bigger number.
‘>’ means ‘greater than’ and ‘<' means 'less than'.

The open end is facing the bigger number and the arrow points to the smaller number.

videolesson.JPG

Greater Than Less Than Examples

  • 3 is less than 8.
  • We can write ‘3 < 8', so that the arrow is pointing at the smaller number.
  • The open end of the comparison symbol is facing the 8 because the crocodile wants to eat the larger number.
  • 7 is greater than 2.
  • We can write ‘7 > 2’, so that the arrow is pointing at the smaller number.
  • The open end of the comparison symbol is facing the 7 because the crocodile wants to eat the larger number.

practiseqs.JPG

Greater Than and Less Than Worksheets and Answers

How to Compare Numbers using Greater Than and Less Than Comparison Symbols

In this lesson we are comparing numbers and writing comparison symbols in between the numbers to show which is the larger number.

The symbol for ‘greater than’ is ‘>’.

The symbol for ‘less than’ is ‘<'.

The way to remember which sign to use is that the symbol will point at the smaller number like an arrow.

Another way to remember greater than or less than signs is that the open end of the symbol will be facing the larger number. We can imagine the symbol like a crocodile’s open mouth and then remember that the crocodile will want to eat the largest number to have a larger meal.

In this lesson we will write the comparison symbols of ‘greater than’ and ‘less than’ to compare two numbers.

We will begin with our first comparison symbol, the equals sign.

  • Equals Sign (=):

The equals sign means ‘the same value as’.

For example:

3 + 1 = 4

4 = 4

This is telling us that 3 + 1 has the same value as four.

example of the equals sign comparison symbol

  • Greater Than Sign (>):

The greater than sign means ‘bigger than’ or ‘larger than’.

For example:

5 > 4

We read this as ‘five is greater than four’.

example of using the greater than sign since 5 is greater than 4

  • Less Than Sign (<):

The less than sign means ‘smaller than’.

For example:

4 < 5

This is read as ‘four is less than five’.

using the comparison sign less than to show that 4 is less than 5

We will use some examples of greater than or less than signs to look at ways to remember the direction in which the greater and less than signs are drawn when comparing two numbers.

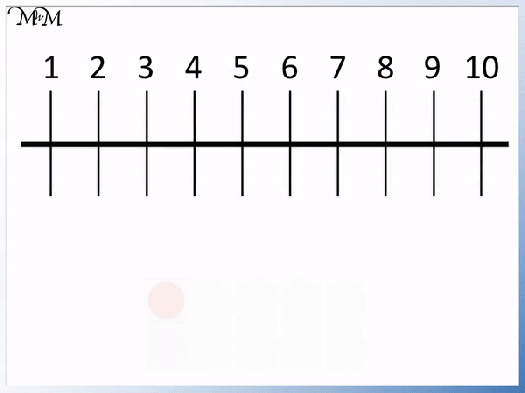
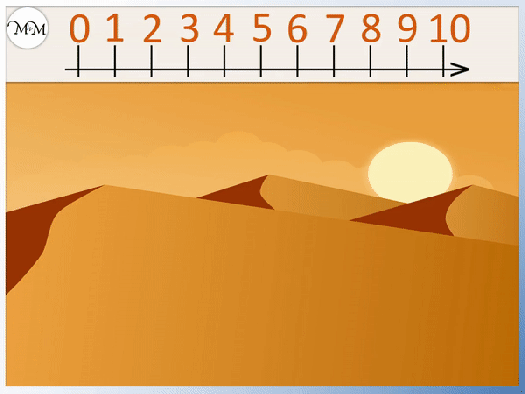
To determine if a number is greater than or less than another number we can look at a number line.

number line to 20

The further we go to the right on our number line, the larger our number.

A number is greater than another number if it is further to the right of it on the number line.

Greater Than Example:

In the example below, we can see that 3 is a larger number than 1. So, we say that three is greater than one.

One way that we can remember which sign to put in between the numbers is to think of the comparison sign as an arrowhead. This arrowhead points to the smaller number.

So, it points to 1.

3 is greater than 1 shown with a greater than sign

Another way to remember which symbol is the greater than sign, is to think of the symbol as a crocodile.

The crocodile is hungry and wants to eat the larger number. So, its mouth opens towards 3.

remembering the greater than symbol with the crocodile's mouth open to the larger number

Less Than Example:

In the example below, we can see that 6 is a smaller number than 8.

We know this because 6 is on the left of 8 on the number line.

So, we say that six is less than eight.

We can use the same two methods that we used previously to remember which comparison sign represents ‘less than’.

Think of the symbol as an arrowhead which always points towards the smaller number. So, it points towards 6 rather than 8.

example of less than sign used with 6 < 8

We could also think of the less than sign as a crocodile that wants to eat the larger number. So, its mouth opens towards 8.

how to remember the direction of the greater than or less than sign with 6 is less than 8

When teaching greater than and less than signs, the biggest mistake is writing the symbols the wrong way around.

Fortunately, the signs are the same shape, just in reverse directions.

The best way to remember the direction is that the sign will point at the smallest number like an arrow.

nextlesson.JPG

Now try our lesson on Addition on a Number Line: Starting at the Largest Number where we learn how to add numbers using a number line.

Halving Odd Numbers: Interactive Question Generator

Halving Odd Numbers: Interactive Question Generator Return to video lesson on Halving Odd Numbers

Related Question Generators

Dealing with Positive and Negative Signs: Interactive Questions

Dealing with Positive and Negative Signs: Interactive Questions Return to video lesson on Adding Negative Numbers and Subtracting Positive Numbers

Related Question Generators

Adding and Subtracting Negative Numbers

Adding and Subtracting Negative Numbers

videolesson.JPG

A guide for adding and subtracting negative numbers

  • Here is a guide for understanding the rules for adding and subtracting negative numbers.
  • If two signs that are next to each other are the same, then they can be replaced by a plus sign.
  • Both ‘- -‘ and ‘+ +’ are replaced with a single plus sign.
  • If two signs that are next to each other are different, then they can be replaced with a minus sign.
  • Both ‘+ -‘ and ‘- +’ can be replaced with a single minus sign.
Two positives or two negatives are the same as addition.

A negative and a positive in any order are the same as a subtraction.

videolesson.JPG

Negative Numbers - Plus and Minus Example.gif

  • Whenever we have a positive and negative sign next to each other we simply replaced both signs with a single subtraction.
  • We replace the ‘+ -‘ or ‘- +’ with a ‘-‘.
  • 10 + – 4 can be rewritten as 10 – 4.
  • 10 – 4 = 6, therefore 10 + – 4 = 6.
  • 17 – + 6 can be rewritten as 17 – 6.
  • 17 – 6 = 11, therefore 17 – + 6 = 11.

videolesson.JPG

Adding a Negative Number or Subtracting a Positive Number

Subtracting Negative Numbers

practiseqs.JPG

Adding Negative Numbers and Subtracting Positive Numbers: Interactive Activity

Adding a Negative and Subtracting a Positive Worksheets and Answers

Subtracting a Negative Number Worksheets and Answers

How to Add and Subtract Negative Numbers

Rules for Adding and Subtracting Negative Numbers

The rule for adding and subtracting negative numbers is to add the numbers if the signs are the same and to subtract the numbers if the signs are different.

If there are two negative signs or two postive signs, then perform an addition. If there is a positive and negative sign in any order, then perform a subtraction.

Here is a guide to the rules for adding and subtracting directed numbers.

guide to adding and subtracting directed numbers

We can think of the negative sign as having an opposite effect. A negative sign will change the sign next to it to have the opposite effect.

In the case of ‘- -‘, the first negative sign changes the negative sign it is next to into a ‘+’. There are four rules for adding and subtracting negative numbers, which are:

Signs Rule
Same signs + and + Add the numbers
– and –
Different signs + and – Subtract the numbers
– and +

These rules are used when there are two signs next to each other in an equation.

For example, 10 + – 4 can be written as 10 – 4, which equals 6.

17 – + 6 can be written as 17 – 6, which equals 11.

Negative Numbers Plus and Minus Examples

In these examples, the combination of ‘+ -‘ or ‘- +’ were replaced with a single subtraction.

Here is an example of subtracting a negative number. We have 2 – – 5. The two signs ‘- -‘ are the same, so we will be performing an addition.

Two negative signs are replaced with a single addition.

example of subtracting a negative number

2 – – 5 is the same as 2 + 5, which equals 7.

The final case shows two positive signs being replaced with one.

For example, 6 + + 3 is the same as 6 + 3, which equals 9.

There is no need to write two plus signs in this sum.

Adding a Negative Number

To add a negative number, simply ignore the negative sign and subtract it from the other number instead of adding it.

For example, here is 15 + – 7. We have a positive number add a negative number. We are adding negative 7 to positive 15.

example of adding a negative number to a positive number 15 + - 7 = 8

Replace the ‘+ -‘ in a sum with a single ‘-‘ sign.

15 + – 7 is the same as 15 – 7.

15 – 7 = 8 and so, 15 + – 7 = 8.

To understand why adding a negative number is the same as a subtraction, we can consider negative numbers as ice cubes. By adding an ice cube, the temperature drops. By adding a negative, the value of the number drops.

Here is a drink that measures 7 degrees.

why is adding a negative the same as subtraction?

We will think of our negative number (-1) as an ice cube.

Adding an ice cube makes the drink colder and so, the temperature goes down.

7 – 1 = 6 and so, adding the ice cube resulted in a subtraction.

We can write 7 + – 1 = 6 or we can write the negative number in brackets as 7 + (-1) = 6.

It does not matter if a negative number is written in brackets or not. Writing the bracket can make it easier for some people to visualise the negative number in this ice cube analogy and also to show that the negative sign belongs to the 1. However, not writing the bracket can make it easier to see the ‘+ -‘ combination and more easily replace it with a ‘-‘.

If instead of adding 1 ice cube, we add 3, then the temperature will drop by 3 instead of 1.

negative numbers shown with temperature example

Each ice cube lowers the temperature by 1. Each ice cube is worth (-1).

The drink was 7 degrees to begin with. Adding three ice cubes can be shown with the sum 7 + – 3.

The temperature goes down by 3 to get to 4.

7 + – 3 = 4 because 7 – 3 = 4.

It does not matter which order the positive and negative signs are written. Both + – and – + are replaced with a -. If there is a positive and negative sign together, the result is a subtraction.

Here is an example of 8 – 5. The 5 can be written as positive 5 or + 5.

We can write 8 – 5 as 8 – + 5 or even as 8 – (+ 5). We don’t normally write the plus sign in front of the 5 because we assume a number is positive unless told otherwise.

why subtracting a positive number is a subtraction.

8 – 5 = 3 and so 8 – + 5 is also equal to 3.

The ‘- +’ is the same as a ‘-‘ sign. The ‘- +’ is replaced with a subtraction.

Subtracting a Negative Number

To subtract a negative number from another number, ignore any negative signs and add the numbers together.

For example, here is 10 – – 4. Ignoring the negative signs, we have 10 and 4. We add 10 and 4 to get 14. Therefore, 10 – – 4 = 14.

example of how to subtract a negative number 10 - - 4 = 14

If two negative signs are next to each other, we can replace them with a positive sign. ‘- -‘ can be replaced with a ‘+’.

Here is another example of subtracting a negative number. We have 8 – – 3.

It can be helpful to circle any double negatives and write an addition sign above.

example of subtracting a negative 8 - - 3 = 11

8 – – 3 can be written as 8 + 3, which equals 11. 8 – – 3 = 11.

To understand why subtracting a negative number results in an addition, we can consider the negative number as an ice cube. Removing an ice cube can make the temperature go up. Removing a negative number can make the value of the number go up.

Here is a drink which contains an ice cube. Its temperature is 5 degrees.

why subtracting a negative number results in an addition

If the ice cube is removed, the temperature will increase. If the ice cube is cooling the drink by 1 degree, then removing it will warm up the drink by 1 degree.

The drink was 5 degrees and is now 6 degrees. 5 + 1 = 6 and so 5 – – 1 = 6.

We can see that the ‘- -‘ in 5 – – 1 = 6 can be replaced with a ‘+’ to make 5 + 1 = 6.

Here is a different drink which contains 3 ice cubes. It is currently 5 degrees.

We will remove all three ice cubes to make the temperature go up by three.

why two negatives make a positive explained

5 + 3 = 8 and so, 5 – – 3 = 8.

Two negative signs make a positive because one negative sign creates the opposite effect in the other negative sign. The effects in each of the two negative signs cancel out to produce a positive effect.

Teaching Adding and Subtracting Directed Numbers

To teach directed numbers, it is important to begin with real life analogies. Some examples include:

  • Removing an ice cube causing the temperature of a drink to increase.
  • Removing a weight can cause something to go upwards
  • Removing a bill or debt means that you have more money to spend.

When teaching adding and subtracting negative numbers in general, it is useful to encourage the circling of the combinations of positive and negative signs before replacing them with a + or – sign. This can build up a longer term strategy which is not so easily forgotten.

With several different negative number rules to remember, it is important to get lots of practice with each method and having written strategies can help with this.

strategy for teaching addition and subtraction of negative numbers

Children can sometimes forget to use this procedure and could believe the sum to be more complicated than it is. By getting them in the habit of circling the two signs and replacing them with a single operation, there is more structure for tackling the question.

nextlesson.JPG

Now try our lesson on How to Subtract Positives from Negatives Using a Number Line where we learn how to subtract a positive number from a number that is already negative.

Halving Odd Numbers

Halving Odd Numbers
videolesson.JPG

Halving Odd Numbers example Summary

  • Odd numbers are not in the two times table and will not make a whole number when we halve them.
  • We separate our odd number into the previous even number, plus one.
  • 5 = 4 + 1
  • We halve the even number, 4, to make 2.
  • We halve the remaining one, to make   1 / 2.
  • Half of 5 is 2 and a half.
To halve an odd number: subtract one, halve it and then add a half.

videolesson.JPG

Halving Odd Numbers Example

  • 7 is an odd number, which we will halve.
  • First we subtract 1 to get an even number.
  • 7 – 1 = 6.
  • We then find half of 6, which is 3.
  • We add one half to 3 to get our answer.
  • 3 +   1 / 2 = 3   1 / 2.
  • Half of 7 is 3 and a half.

practiseqs.JPG

Halving Odd Numbers Interactive Question Generator

Halving Odd Numbers Worksheet and Answers

Halving Odd Numbers

Odd numbers cannot be halved to give a whole number. We will look at methods we can use for teaching halving odd numbers.

In our first example of halving odd numbers, we are asked to halve the number five. We’ll start by looking at the method of division by sharing. We can represent the number five with five counters. We want to halve it, which means that we want to share it equally across two groups.

We can easily halve four of the counters by placing two in each group, since 4 is even. However, there is one counter remaining in the middle. If we put this whole counter in either of the groups, we would not have shared five equally.

The only way that we can share this last counter equally is to split it in half.

Each half can then be placed in each group. Each group contains 2    1 / 2   counters.

Therefore, half of 5 is 2  1 / 2  .

teaching halving odd numbers with counters, halve of 5 is 2 and a half

When first introducing halving odd numbers and teaching halving to your child, you could show this easily with plasticine or food, tearing the last item in half.

Starting again with our five counters, we can develop a method to work out halving an odd number mentally.

sharing five counters into two equal parts

We found that it was easy to halve the counters when the number was even.

We were able to halve four of the counters easily. So, we can begin by subtracting 1 from our odd number.

Subtracting one from every odd number will always give us an even number.

  • Step 1: Subtract 1

the first step of our method for halving the odd number, 5

5 – 1 = 4

Now that we have an even number, we can easily halve it.

  • Step 2: Halve it

dividing the even number 4 equally into two parts to halve it

4 ÷ 2 = 2

We have easily divided the four counters into two groups.

Now, we must remember that one counter that we previously subtracted.

  • Step 3: Add  1 / 2

example of halving odd numbers, half of 5 is two and a half

The ‘1’ that we originally subtracted must also be halved. Half of 1 is    1 / 2.

So, we must add this on to the 2.

2 +  1 / 2 = 2  1 / 2

Half of 5 is 2  1 / 2.

Another way of thinking of this is that we were able to partition the 5 into 4 + 1.

Half of 4 is 2

Half of 1 is    1 / 2

2 +  1 / 2 = 2 1 / 2

Now we’ll look at another example of halving odd numbers where we will use our three steps.

We are asked to find half of 7.

We can work out this example of halving an odd number by partitioning 7 into 6 + 1.

We do this in the following three steps.

halving the odd number 7 by partitioning

  • Step 1: Subtract 1

7 – 1 = 6

We subtracted 1 to give us an even number to halve.

  • Step 2: Halve it

6 ÷ 2 = 3

  • Step 3: Add    1 / 2

3 +    1 / 2 = 3   1 / 2

We add  1 / 2   because this is half of the ‘1’ that we originally subtracted.

We worked this out by partitioning the 7 into 6 + 1. This partitioning method is the easiest to do mentally when teaching your child to halve odd numbers.

First, we halved the 6.

Half of 6 is 3

Next, we halved the 1.

Half of 1 is    1 / 2

Finally, we added these together.

3 +  1 / 21 / 2

nextlesson.JPG

Now try our lesson on Listing Pairs of Factors (with Factoring Calculator) where we learn what factor pairs are and how to find them.

What are Even and Odd Numbers?

What are Even and Odd Numbers?
videolesson.JPG

Even numbers are in the two times table, odd numbers cannot be halved equally Summary

  • An even number is a
    whole numberA counting number: 0, 1, 2, 3 … etc. It does not have a decimal or fraction part.
    in the two times table.
  • An even number can be halved to leave another whole number.
  • An odd number is not in the two times table and cannot be divided equally into two whole numbers.
  • 6 can be divided into two lots of three, so it is an even number.
  • 7 cannot be divided into two equal whole numbers, so it is an odd number.
  • Even numbers end in 0, 2, 4, 6 or 8.
  • Odd numbers end in 1, 3, 5, 7 or 9.
An even number is in the two times table, ending in 0, 2, 4, 6 or 8.

An even number is a whole number that can be halved to get another whole number.

videolesson.JPG

Even and Odd Numbers Examples of odd and even numbers

  • Even numbers are in the two times table and can be arranged in pairs of
    whole numbersA counting number: 0, 1, 2, 3 … etc. It does not have a decimal or fraction part.
    .
  • Odd numbers cannot be arranged in a pair and will always have a spare unit.
  • We can see that the first odd number is one because it does not form a pair.
  • We alternate between odd and even every time we add one.
  • The first odd numbers are: 1,3, 5, 7 and 9.
  • The first even numbers are: 0, 2, 4, 6, and 8.

practiseqs.JPG

Odd and Even Numbers Worksheets and Answers

What are Odd and Even Numbers?

Even numbers are
whole numbersA counting number: 0, 1, 2, 3 … etc. It does not have a decimal or fraction part.
in the two times table.

Even numbers can be arranged in pairs. This means that they can be divided into two equal parts, or halved exactly.

The whole numbers are 0, 1, 2, 3, 4, 5, 6, 7, 8, 9, 10 … onwards.

We will look at these numbers in this lesson and we will start by looking at zero.

zero is an even number

The definition of an even number is a whole number that can be halved exactly to leave another whole number.

Half of zero is zero.

And zero is a whole number.

Therefore zero is an even number.

When teaching odd and even numbers, it can be common for a child to be unsure as to whether zero is odd or even so it is important to tell them specifically that zero is actually even.

We will now look at our next example of an even number: 2 is an even number as it can be arranged in a pair of two ones

Two is an even number. It can be halved exactly to equal one.

2 x 1 = 2

Two is in the two times table and so it is even.

4 is an even number because it can be divided exactly by two, it is in the two times table

Four is an even number. It can be arranged a pair. When divided into two equal parts, each part is worth 2 because 4 ÷ 2 = 2.

2 x 2 = 4

Four is in the two times table and so it is even.

6 is an even number because it is in the two times table

Six is an even number. It is in the two times table. It can be divided by two to equal three.

8 is an even number and can be arranged in two pairs of four

Eight is an even number. It is in the two times table and we can see that it can be arranged in pairs.

Eight is two pairs of 4.

ten is an even number because it is divisible by 2

Ten is an even number. It can be halved to form two groups of five.

We can see from our list of even numbers so far that they start at zero and there is a difference of two between each even number.

If we have an even number and we add two, we will be at another even number.

Odd numbers are not in the two times table.

Odd numbers cannot be arranged in pairs. This means that they can’t be divided into two equal parts, or halved to give a whole number.

One is an example of an odd number:

one is the first odd number

One is the first odd number. It can’t be arranged in pairs.

three is an odd number

Three is an odd number. It can’t be divided into two equal parts (where each part contains a whole number).

Three is not in the two times table.

five is an odd number

Five is an odd number. It is not in the two times table.

seven is an odd number

Seven is an odd number. It can’t be halved (to give a whole number).

9 is an odd number

Nine is an odd number. It is not in the two times table and therefore can’t be divided into two equal parts (where each part is a whole number).

Below is a summary of the even and odd numbers from one to ten. You will notice that the numbers alternate between being even and odd.

Every time we add one we change from being odd to even or even to odd.

odd and even numbers to ten

We can think of the even numbers as being the numbers in the two times table and then the odd numbers are the numbers that are in between the even numbers.

nextlesson.JPG

Now try our lesson on Multiples of Two on a Number Grid where we learn further about the even numbers using a number grid.

Bar Chart Maker

Bar Chart Maker Click to edit the names of the title, x-axis and y-axis on the bar chart below.

Change the names of each class / category and change the color of each bar using the buttons at the base of the bar chart.

Graph 0-10.png

blank

Counting to 20 on a Number Line

Counting to 20 on a Number Line
videolesson.JPG

Counting to 20 Summary

  • We will count each snake by saying the number as we count it and then crossing it off.
  • We have ten snakes to begin with.
  • Some more snakes appear and we will count on from ten to obtain a total.
  • We have 11, 12, 13, 14, 15, 16, 17, 18 , 19 snakes.

videolesson.JPG

Counting to 20 Example

  • We will count the number of dogs by crossing off each dog as we say its number.
  • We have twenty dogs.
  • We move along our number line one place for every number that we count.

practiseqs.JPG

Interactive Online Counting Activities

Counting Number to Twenty using a Number Line

We are going to count the number of dogs.

To do this we start at zero on the number line and move along one place for every dog that we count.

We can point at each dog and say the number as we count it.

We will then cross off each dog after we say the corresponding number so that we don’t count it twice. This can be more important with larger numbers and in our image below, the dogs are spaced out in no particular order.

We count ‘1’ and cross out a dog.

We count ‘2’ and cross out another dog.

20 dogs to count with a number line

We count ‘3’.

We count ‘4’.

We count ‘5’. 20 dogs to count with a number line

We continue to move along the number line.

…6, 7, 8… 20 dogs to count with a number line

We continue to cross of each dog as we count it.

…9, 10, 11…

20 dogs to count with a number line

…12, 13, 14…

20 dogs to count with a number line

…15, 16, 17…

20 dogs to count with a number line

…18, 19, 20.

20 dogs to count with a number line

We have now counted all of the dogs.

The last number that we say as we cross off our last dog is 20.

There are twenty dogs altogether.

In the next example, we will count the number of snakes.

We will count the following snakes by counting up on ones and crossing off each snake as we count it.

There are 1, 2, 3, 4, 5, 6, 7, 8, 9, 10.

counting to ten snakes using a number line

There are ten snakes altogether.

Some more snakes appear. So, we start at 10 and count up in ones as we move along the number line. We will continue to cross off each snake as we count it.

counting snakes past ten using a number line

We count ‘11’ and cross out a snake.

We count ‘12’ and cross out a snake.

We count ‘13’ and cross out another snake.

counting to twenty with a number line

We continue to count up in ones, crossing off each snake as we count it.

…14, 15, 16…

counting to twenty on a number line

…17, 18, 19…

12.png

We have crossed off all of the snakes. This means that we have counted all of them. There are nineteen snakes altogether.

nextlesson.JPG

Now try our lesson on Tens and Units Place Value Chart where we learn how to write two-digit numbers and group tens and units (ones).

Counting to Ten using a Number Line

Counting to Ten using a Number Line
videolesson.JPG

Counting to three using a number line summary

  • We always start at zero, which is at the beginning of our number line.
  • To count the birds that have appeared, we can point at each bird and say the number as we count it.
  • We cross off each bird that we count to make sure we don’t count it again.
  • Once all birds have been crossed off, this is the number of birds that we have.
  • We have three birds in total.
Only say one number as you count each object.

Cross it off after you count it.

videolesson.JPG

Counting to 10 Example

  • Originally there are zero snakes, so we start at zero on our number line.
  • Some snakes appear, which we will count.
  • Remember to point at each snake that we count and say one number with each snake we point at.
  • We cross off each snake after we have counted it and said its number.
  • We have: 1, 2, 3, 4, 5, 6, 7, 8 snakes.
  • We move one place along our number line every time we say the next number.
  • We have crossed off all of the snakes after we have said the number 8.
  • Since the number 8 was the last number we said, we have eight snakes.

Teaching your Child to Count to Ten using a Number Line

In this lesson we are going to learn how to count to ten. We will be looking at some examples that will help you teach your child to count.

We will be counting the numbers of animals that we have in these examples. We will look at numbers ranging from zero to ten, using a number line to help us.

We are going to count the number of birds in the following example:

how to teach counting to three on a number line for children

Before we even start counting any of the birds, we first start at zero on our number line.

When teaching your child to count, it is helpful to tell them that we first start at zero. You could ask them to put their finger on the zero place on the number line.

As we count the birds, we will move along the number line, one number at a time.

We would certainly recommend your child knowing how to say the numbers one to ten in order by memory before actually counting anything.

If your child is familiar (preferably fluent) with saying the sequence:

1, 2, 3, 4, 5, 6, 7, 8 , 9, 10

verbally, then the actual process of counting will be much easier.

If we were counting physical items, we could always move each item to one side as we count it, however we will not always be able to do this.

When teaching your child to count, we can consider some important strategies to help them.

Only say one number for each object that we count (it can be helpful for your child to physically point at each bird as they say each number).

If they say more than one number as they count one bird, start again.

We will cross out each bird after we count it and say the number, so that we don’t count the same bird more than once. We say ‘one’ as we point at the bird and cross it off afterwards.

one bird is crossed off as we move along the number line when counting

We count the next bird by moving along the number line. We count two.

counting two birds as we count on our number line

Next, we count the final bird by moving along the number line to three.

We cross off this bird after we say the number ‘three’.

Since we have crossed off all of the birds, we stop. ‘Three’ was the last number that we said, therefore there are three birds altogether.

three birds counted on a number line when teaching counting

It would be worth showing your child the same process as we move along the number line at the top.

We counted the birds by starting at zero and moving one place along the number line for every bird. We counted one, two, three.

counting to three in stages on a number line

In the next example, we will count the number of dogs.

Remember that we start at zero and it is worth saying zero with your child before you start counting.

We count the first dog as ‘1’ and cross it out after we say the number.

We count the next dog as ‘2’ and cross it out after we say the number.

counting five dogs using a number line

We count ‘3’ and cross out the next dog after we say the number.

We count ‘4’ and cross out another dog.

We count ‘5’ and cross out the final dog.

There are five dogs altogether. Remember once we have crossed out all of the animals, we can stop counting.

counting five dogs using a number line

When teaching your child to count drawn objects, you could cross out drawings on paper. If you are teaching your child to count physical counters, you could move the counters as you count them.

As your child practises counting, we slowly move on to counting without crossing out and saying the number out loud as their eyes track to the next object, rather than pointing.

In the final counting example, we will count the number of snakes.

Again, we will start at zero and move one place along the number line for each snake that we count.

We count ‘1’ and cross out a snake.

We count ‘2’ and cross out another snake.

counting snakes on a number line

We count ‘3’ and cross out a snake.

We count ‘4’.

We count ‘5’.

counting snakes on a number line having crossed out 5

We count ‘6’.

We count ‘7’.

Finally, we count ‘8’.

counting eight snake using a number line We have now counted all of the snakes. Therefore, there are eight snakes altogether.

nextlesson.JPG

Now try our lesson on Counting to 20 using a Number Line where we learn how to count on from ten, counting the numbers to twenty.

How to Find the Volume of a Cuboid

How to Find the Volume of a Cuboid

videolesson.JPG

what is Volume of a cuboid by counting cubes

  • A cuboid is also known as a rectangular prism and it is shaped liked a box.
  • A cuboid is a 3D shape, which means that it has height, length and width.
  • The volume of a cuboid can be measured by how many 1 cm3 cubes fit inside it.
  • These two cuboid examples have a top
    faceA flat surface of a shape.
    area of 4 x 3 = 12 cm2.
  • Therefore there are 12 cubes in each layer of these cuboids.
  • The volume of the cuboid with one layer is 12 cm3.
  • The volume of the cuboid with two layers is 24 cm3.
  • To find the volume, we multiply the length x width x height for each cuboid.
  • Our
    unitsUnits tell us what we are measuring in. In this case, we are using centimetres rather than inches or kilometres.
    for volume, cm3, contain a three because we multiplied in three directions.
The volume of a cuboid is found by multiplying the length x width x height.

The units are cubed, e.g. ‘cm3‘.

videolesson.JPG

volume of a cuboid Example by counting cubes and multiplying lenght x width x height of the cuboid

  • The volume of this cuboid is found by by multiplying the length x width x height in any order.
  • 4 cm x 3 cm x 3 cm = 36 cm3.
  • The volume of the cuboid is 36 cm3.
  • The volume of this cuboid tells us how many 1 cm3 cubes fit inside it.
  • We can count these cubes by first finding the number of cubes in each layer.
  • The number of cubes in each layer is the length x width of the cuboid.
  • 4 x 3 = 12 so there are 12 cubes in each layer.
  • There are 3 layers in total, so three layers of 12 cubes.
  • 12 x 3 = 36 so there are 36 cubes inside the cuboid.

practiseqs.JPG

Volume of a Cuboid Worksheets and Answers

Finding the Volume of a Cuboid

How to Find the Volume of a Cuboid

To find the volume of a cuboid, multiply its length, width and height together in any order. The units of the length, width and height need to be the same and this unit is cubed in the final volume answer.

For example, a cuboid with a length of 5 cm, a width of 2 cm and a height of 3 cm has a volume of 5 x 2 x 3 = 30 cm3.

example of how to find the volume of a cuboid

It does not matter in which order the numbers are multiplied together. 5 x 2 x 3 and 2 x 3 x 5 both equal 30.

The length, width and height of a cuboid must be right angles to each other. When finding the volume of a cuboid, it is important to make sure that the 3 dimensions of length, width and height are all at right angles to each other when measuring them. It is possible to make the mistake of reading the wrong dimension and read one of the dimensions twice.

The height of a cuboid is always measured as the vertical distance from the bottom to the top. In this example, the height is 3.

diagram showing the height of a cuboid

Aside from the height, there are two remaining sides. The length is the longest side and the width is the shortest side.

diagram showing the length of a cuboid

diagram showing the width of a cuboid

The length of this cuboid is 5 and the width is 2.

The Formula for the Volume of a Cuboid

The formula for the volume of a cuboid is V = l x w x h, where l is the length, w is the width and h is the height. This formula can be written more concisely as V = lwh. The volume is in cubic units.

how to find the volume of a cuboid

The volume of a cuboid is length x width x height. This equation can be simplified into a formula by replacing length with the letter l, width with w and height with h.

V = l x w x h

formula for finding the volume of a cuboid

We don’t tend to write multiplication signs when using algebra. Writing the formula V = l x w x h without multiplication signs allows us to write the formula for a volume of a cuboid in its simplest form as V = lwh.

A cuboid is also known as a rectangular prism. Therefore finding the volume of a rectangular prism is the exact same method used for finding the volume of a cuboid.

To find the volume of a rectangular prism, multiply the length, width and height together in any order. For example, a rectangular prism with a length of 4 cm, a width of 3 cm and a height of 2 cm has a volume of 4 x 3 x 2 = 24 cm3.

example of how to find the volume of a rectangular prism

The formula for the volume of a rectangular prism is V = l x w x h.

Volume of a Cuboid by Counting Cubes

The volume of a cuboid can be found by counting how many centimetre cubes its contains. It is easiest to count the cubes in one layer and then to multiply this by the number of layers in the cuboid.

A cuboid has three dimensions. The dimensions are the height, length and width.

lengthwidthheightcuboid.JPG

Here is a cuboid with only one layer.

There are twelve cubes in total. We know this because the length is 4 and the width is 3. To find the number of cubes in each layer of a cuboid, multiply the length by the width. 4 x 3 = 12 and so, there are 12 cubes in this layer.

A cuboid made from 12 cubic centimetre cubes

The volume of this cuboid is 12 cubic centimetres, 12 cm3.

When teaching volume by counting cubes, it is useful to have some physical cubes on hand to make the shapes with. The number of cubes can easily be counted as they are added.

Here is another cuboid, which is the same as before but has an extra layer.

A cuboid with length 4 x width 3 x height of 2 made up of centimetes cubed

The number of cubes in each layer has not changed. The length is still 4, the width is still 3 and so, the number of cubes in each layer is 4 x 3 = 12.

However we now have two layers of 12. 2 lots of 12 is found by multiplying 2 and 12. 2 x 12 = 24.

The volume of this cuboid is 24 cm3, 24 cubic centimetres.

Here is a cuboid with 3 layers. There are still 12 cubes in each layer.

volume of a cuboid containing 36 centimetre cubes.

We have 3 layers of 12 cubes. 3 x 12 = 36 and so the volume of this cuboid is 36 cm3, 36 centimetres cubed.

The number of cubes in each layer can be seen by looking at the cuboid directly from the top.

area of a rectangle 4 x 3 = 12 centimetres squared

The volume of a cuboid is given by length x width x height. The length x width tells us the number of cubes in each layer of the cuboid and the heigth tells us how many layers there are. Multiplying the three dimensions together tells us the total number of centimetre cubes and hence, the volume in cubic centimetres.

Units of Volume for a Cuboid

The length of each side of a cuboid can be measured in centimetres, metres or any other unit of length. The units of measurement for volume must be this unit of length cubed.

For example, if the side of a cuboid is measured in centimetres, then the volume is measured in centimetres cubed (cm3).

If the side of a cuboid is measured in metres, then the volume is measured in metres cubed, (m3).

The small three in the unit of measurement is pronounced as ‘cubed’. This number tells us how many dimensions (directions) have been multiplied together.

For example, here is a rectangle with a length of 4 cm and a width of 3 cm. Its area is found by multiplying the length and width. 4 cm x 3 cm = 12 cm2.

units of area in a rectangle example of 4 x 3 = 12

In the calculation of 4 cm x 3 cm = 12cm2, we multiply a centimetre by a centimetre. To show that two centimetres lengths are multiplied together, we write 12 cm2. The 2 shows us that 2 lengths were multiplied to get this result.

If we have one row of twelve 3D cubes, then we have a volume of 12 cm3.

a cuboid made from a single layer of cubes

This shape is now 3D. A 3 dimensional shape can be physically held as it has length, width and height. There is only one layer of cubes, so this shape has a height of 1.

The volume is found by 4 cm x 3 cm x 1 cm = 12 cm3.

When finding the volume, three sides measured in centimetres are multiplied together and so, the units of volume are cm3.

Here is a cuboid with three layers of 12.

The volume is 4 cm x 3 cm x 3 cm = 36 cm3.

example of finding the volume of a rectangular prism

Again, we multiplied the length, width and height together. Multiplying in 3 directions means that a three is needed as the power of our units.

cm x cm x cm = cm3.

cm3 is pronounced as centimetres cubed or cubic centimetres.

nextlesson.JPG

Now try our lesson on Area of a Compound Shape where we learn find the area inside a shape made up of more than one rectangle.

error: Content is protected !!